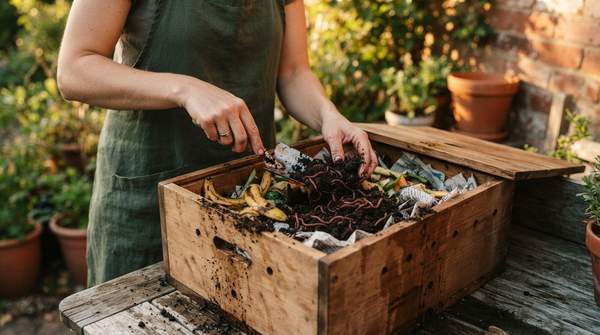
Vermicomposting offers a simple and efficient way to transform kitchen scraps into a nutrient-rich soil conditioner right in your home. This method of composting uses worms to break down organic waste, requiring little space and inexpensive materials. With a suitable container, the right kind of worms, and proper bedding, you can create a self-contained ecosystem that recycles food waste and produces valuable compost for your plants, whether indoors or out.
Getting Started: Essential Components of Your Vermicomposting System
A successful home vermicomposting system relies on four fundamental components: a container, bedding, worms, and a steady supply of food scraps. According to guidance from the University of Maryland Extension, these elements work together to create a balanced environment where worms can thrive and efficiently digest organic material. The end product, known as vermicompost, is a dark, crumbly substance containing worm castings and decomposed matter that serves as an excellent source of plant nutrients.
The most crucial inhabitants of your bin are the worms themselves. The University of Maryland Extension identifies redworms, also called red wigglers or manure worms, as the ideal species for this task. These worms are surface feeders that naturally consume decaying plant and animal matter, making them perfectly suited for life in a compost bin rather than in garden soil. Urban Worm Company suggests starting a new bin with one to two pounds of red wigglers.
The container, or worm bin, provides the physical structure for your composting operation. The Rodale Institute notes that bins can be constructed from various materials, including plastic, wood, or even Styrofoam, which offers the added benefit of insulation. While smaller bins are suitable for beginners, a larger container—typically around 18 inches wide, 24 inches long, and 18 inches deep—can accommodate a more substantial worm population as your system matures.
Step-by-Step Setup: Building Your Worm Bin
Assembling your first worm bin is a straightforward process. Once you have selected a container, the next step is to prepare the bedding, which will serve as the initial habitat and a food source for your worms. This material should be moistened before the worms are introduced. A helpful practice recommended by Red Worm Composting is to mix the bedding with a small amount of moist food waste and let it sit in the closed bin for about a week before adding the worms. This pre-conditioning period helps establish a beneficial microbial community and ensures moisture is evenly distributed, creating a welcoming environment for the worms.
When the bedding is ready, you can introduce the redworms. Gently place them on top of the bedding, and they will naturally burrow down to escape the light. Give them a few days to acclimate to their new home before you begin a regular feeding schedule. The initial food mixed into the bedding will provide them with enough sustenance as they settle in.
Proper ventilation is also important for a healthy bin. The Rodale Institute advises that bins should be well-ventilated, with numerous holes on the bottom and along the sides. The U.S. Environmental Protection Agency (EPA) adds that any holes or gaps should not be larger than a quarter of an inch to prevent worms from escaping while still allowing for air circulation.
Feeding Your Worms: What to Add and What to Avoid
Maintaining a healthy worm bin depends heavily on providing a balanced diet. The EPA recommends a ratio of two to three parts carbon-rich materials, known as "browns," to one part nitrogen-rich materials, or "greens." This balance helps prevent odors and ensures the worms receive the nutrients they need.
Acceptable food scraps for your worms include a wide variety of common kitchen waste. You can safely add:
- Vegetable scraps
- Fruit peels and cores
- Coffee grounds and filters
- Tea bags
- Crushed eggshells
- Stale bread and grains
To avoid attracting pests and creating foul odors, the EPA explicitly advises against adding certain items to your bin. These materials can disrupt the bin's ecosystem and harm your worms. Materials to always avoid include:
- Meat and fish
- Dairy products like cheese and milk
- Greasy or oily foods
- Pet waste
When you add food, it is important to bury the scraps within the bedding. The Rodale Institute explains that leaving food uncovered is a sure way to attract fruit flies. If you notice that worms are not eating certain foods, the EPA suggests they may not like that particular item or it may be too large. Cutting up larger items like potato peels or citrus rinds can make them more palatable for the worms.
Vermicomposting Troubleshooting Checklist
Even with careful setup, beginners may encounter a few common issues. Most problems are easy to diagnose and fix by adjusting moisture, feeding habits, or aeration. This checklist helps identify the symptoms, likely causes, and recommended actions to get your bin back in balance.
| Symptom | Likely Cause | Recommended Action |
|---|---|---|
| Bad Odors A foul, sour, or rotting smell coming from the bin. |
The bin is too wet, creating anaerobic conditions. There may also be too much nitrogen-rich food or you are overfeeding the worms. | Stop adding food for a week or two. Gently fluff the bedding to introduce more air. Add dry, carbon-rich materials like shredded paper or cardboard to absorb excess moisture. |
| Pests Presence of fruit flies, ants, or other unwanted insects. |
Food scraps are not being buried completely. The bin may contain prohibited items like meat or dairy, or an excess of fruit scraps. | Always bury new food scraps at least an inch deep in the bedding. Remove any prohibited foods. The Rodale Institute suggests using a fruit fly trap made with apple cider vinegar if flies persist. |
| Worms Trying to Escape Worms are crawling up the sides or lid of the bin. |
According to the EPA, this indicates the environment is unsuitable. The bedding is likely too wet, too dry, or you have overfed the worms. | Check the moisture level; it should feel like a damp sponge. If too wet, add dry bedding. If too dry, spritz with water. Reduce the amount of food you are adding. |
| Food Not Breaking Down Food scraps remain uneaten for long periods. |
The food pieces may be too large for the worms to process. The worms may not like that particular type of food, or the worm population is too small for the amount of food being added. | Cut food scraps into smaller pieces. The EPA advises removing any foods the worms consistently avoid. Reduce feeding amounts to match what the worms can consume between feedings. |
Maintaining a Healthy and Productive Worm Bin
The key to long-term success is to successfully maintain a home vermicomposting system by consistently monitoring bin conditions, feeding appropriately, and promptly addressing any issues using the provided troubleshooting guide. A well-managed bin is a low-maintenance system that quietly and cleanly converts waste into a valuable resource. By paying attention to the balance of food, moisture, and bedding, you can ensure your worms remain healthy and productive.
Your efforts will be rewarded with a continuous supply of rich, dark compost. A healthy worm bin will have no foul odors, minimal pests, active worms remaining within the bedding, and a steady conversion of food scraps into dark, earthy compost. This finished product can be harvested every few months and used to enrich the soil of houseplants, container gardens, and outdoor flower beds, completing a sustainable cycle from your kitchen back to the earth.
Sources
- How to Start a Worm Bin the Right Way: Vermicomposting 101 — Urban Worm Company
- Vermicomposting for Beginners - Rodale Institute
- Getting Started - Red Worm Composting — Red Worm Composting - WAY Too Much Fun With Worms!
- Composting At Home — US EPA